
Well, “Free” in that we pay tens of thousands of dollars to attend here…. but still, each Columbia student already has a personal Columbia University web space available to her/him! That’s right, you can host your own site, display files and working class projects, and more. The initial set-up is not too difficult, but the CUIT website can be hard to navigate for this purpose. So here’s a nice run-through on setting up your own webspace from your ol’ pals at NMTF; soon you’ll have your own directory at www.columbia.edu/~uni123 and you can upload your own files (then you can really learn how to code).
Step 1: Read this page, which is rather well-hidden, to see that I am not lying – you really do have your own web space assigned to your UNI!
Step 2: Check to make sure you have an FTP program installed on your computer; if not you can download one from CUIT [WinSCP for Windows users, Fugu for Mac users]. Open your program.
[Note: I will proceed with explaining the process on WinSCP (which is available on SIPA CITRIX and I think the Columbia computers), though it should be similar on Macs!]
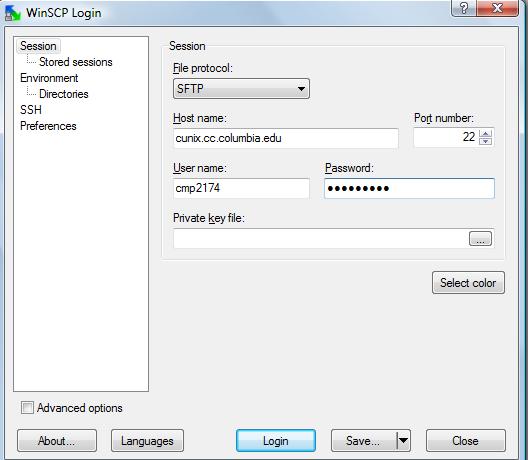
Step 3: At the login screen, input “cunix.cc.columbia.edu” under Host Name, your UNI for user name, and your CU Password is your password. (see below for WinSCP screenshot). Hit Login.

Step 4: 1. In the Main Menu of WINSCP go to Commands>Open Terminal. Click OK to the popup message. In the Enter command box, type the following commands:
chmod a+x ~
Click the Execute Button
chmod a+rx ~/public_html
Click the Execute Button. (Note these are UNIX commands that allow you to make a directory and allows the world to read your files, but not write files to your website directly.) This is the only time you will need to do this. Once you have made your directories readable to the world, they will always be world-readable. Your screen should look like the following:

Step 5: Close the command box, and open your file “public_html”. Drag a file into the folder. Now open a web browser and go to “www.columbia.edu/~youruni/filename”, where youruni is Your UNI and filename is the name of the file you dragged into the public_html folder. For instance, here is a photo I uploaded to my public folder: http://www.columbia.edu/~cmp2174/SantaChris.JPG
Step 6: Experiment! You now have a public web space where you can add content. Come back soon to learn how to put your own customizable google map up there!
(If any of this was unclear, you can also follow more detailed WinSCP instructions here)