


Homemade gyros, a la my mother-in-law.This is one of those dishes that my husband and his brother ask for every time they go to visit their parents. My mother-in-law, Janet, dutifully obliges, which requires driving over an hour away from their rural city to a hole-in-the-wall Greek restaurant and imported foods grocery so she can get the proper pita, feta, and olives. While she’s there, she usually picks up some jarred grape leaves to make her mother’s stuffed grape leaves recipe (she’s of Lebanese descent and her grandparents emigrated from Beirut) – she claims that until the recent rising interest in Mediterranean food, the only places she could get authentic Lebanese ingredients were actually Greek. Once she gets home, she marinates the chicken and throws it and the vegetables on the grill, no matter the time of year – my father-in-law, whose grandparents were Norwegian immigrants, happy obliges by trudging out into the snow when she makes this in the winter. And in the end, all this love labor is so worth it: perfectly grilled chicken edges, salty and tangy feta and olives, sweet charred peppers and onions, and fluffy bread. How was I ever going to recreate this in my city apartment without a grill?
The good news is that in NYC it’s a lot easier to get quality feta and olives, and even sometimes Greek pita. In fact, my local independent supermarket (which is my standard go-to) is owned by a Greek couple and most of their prepared foods are Greek-style. Ironically, though, they typically only sell Arab-style pita. “Pita” is actually the Greek name for that flatbread, and the Greek style of it is fluffy without a pocket. Pocket pita is a variation on a bread that in Arabic is simply called “hubs al-Arabi” or “Arab bread” – it’s almost more like a fresh tortilla, with very thin sides and the signature pocket that comes from the water in the dough turning to steam and puffing the bread when it’s exposed to the high cooking temperature. It’s delicious, but not what I want for this particular recipe. What’s closest to Greek pita, and shockingly easy to find these days, is naan. Pre-made packaged naan is certainly not as pancakey and fluffy as the fresh stuff, but for this hearty wrap it’s perfect – thick and sturdy enough to hold the ingredients, and when it’s heated up it’s perfectly pliable (if you don’t heat it, the bread will definitely fold and crack when you try to wrap it).
My other trick for this dish is using my oven’s broiler. Broilers are making a comeback as people realize that they’re high-powered upside down grills. Back a few ill-equipped apartment kitchens ago, when I had a tiny gas oven range with a separate broiler compartment below, I used to make shockingly good pizza by cranking up the oven as hot as it would go, cooking the pizza for 10-15 minutes, and then moving it down to the broiler (which was just a series of huge flames) for 5 minutes to finish. I’ve been experimenting with cooking chicken skewers under the broiler in the past year, mostly inspired by Breath of the Wild, which honestly sometimes I just play as a cooking simulator the food looks so good. I realized that I can imitate a proper grill if I turn the chicken (or vegetables or whatever) as soon as it starts to brown on the outside, about every 5 minutes depending on the size of the pieces. Normally, if I only turn it once, the first side to cook will end up soggy because the juices have dripped down on it. But turning it again soon after caramelizes those juices (once you use the word caramelize anything sounds good, doesn’t it?) and you end up with the same kind of crust as if you were cooking over a grill. It’s even better if you have a marinade clinging to the food or, as I’ve learned, baste with a slightly sticky sauce. This method is actually the proper traditional method for roasting, as food historian Ken Albala has shown in his recreations.
It works so ridiculously well here, I can’t even begin to explain how much better it is as a cooking method than almost any other way. The downsides are a few, though: 1) you have to stand around and open the oven a lot, which some people find unpleasant; 2) this increases your chances of accidentally burning yourself; 3) if you have any extra sauce on the pan it can really burn, which can create a good bit of smoke; and 4) that can be a pain to clean off the pan. I can’t really help you with #1, but here are my various tips for the others. Make sure you have good, sturdy pot holders that really hold up to high heat, and go slowly – it’s ok if the food gets just a tiny bit burnt, but you’ll be way more unhappy if you get even a tiny bit burnt. Make sure you shake off as much marinade as possible before the chicken (or whatever you cook using this method) goes into the pan, and don’t add more sauce than necessary when basting. You should also ventilate your kitchen as effectively as possible BEFORE you even turn on the oven – turn on a cooking vent full blast, open a window (and stick a box fan in the window facing out, which will suck the air out of the room rather than blowing smoke further into the room), and disable your smoke detector if it’s very fussy (or cover it with a towel). Finally, place some aluminum foil thoroughly and tightly over your cooking pan and use silicone tongs so you don’t rip it. Or, if you’re not into disposable cooking surfaces, as soon as you remove the food from the pan pour warm-ish water into the pan to loosen any burnt splotches while it’s still hot.
Ok, enough chatter. Onto the recipe!
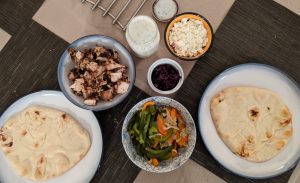
This makes enough for about 4 wraps, so adjust as needed (makes great leftovers).
Prep:
Marinate the chicken:
Using kitchen sheers, cut two chicken breasts in half so that you have four oblong pieces and place them in a bowl (or, better yet, a container with an airtight lid) and use the points of the sheers to perforate them a few times on both sides. Add to the chicken: 1 tbsp Dijon mustard, 1/2 – 1 tsp Italian seasoning or dried oregano (this depends on what you have and how fresh it is – smell it and if it smells pungent add less), 1 tsp kosher salt, 1/2 tsp cracked pepper, 1/4 cup balsamic vinegar (use the cheap stuff for this), and 1/4 cup olive oil (again, the cheap stuff). Mix thoroughly to combine the ingredients and coat the chicken – you can do this with a spoon or tongs, or you can attach that airtight lid and just shake thoroughly. Let the whole thing sit, covered, at room temperature until you’re ready to cook (no, this is not a food safety hazard, things will get going pretty quickly. If you don’t plan on cooking right away, you can put the chicken back in the fridge, but I wouldn’t recommend letting this marinate for more than 2 hours, and you really do want the chicken to be closer to room temperature when it starts to cook.)
Prep the toppings:
Slice one green bell pepper and one colorful bell pepper (it really doesn’t matter whether it’s red, orange, or yellow, just use whatever looks the best) into thin strips – roughly 1/4″ wide. Slice one small yellow onion into 1/8″ slices.
Chop 1/4 cup Kalamata olives and crumble about a 1″ slice of feta (I like Presidente brand for this).
In a bowl or jar, combine 1/2 cup whole fat plain Greek yogurt, 1 tsp or so finely chopped dill (3 sprigs or so, just the tops not the stems), 1 clove of finely minced or grated garlic, 1/4 cup grated cucumber (hothouse cucumbers are best for this, also called English or Persian cucumbers, they’re the ones that are typically longer and come shrink-wrapped), and a pinch of salt.
Cook:
Turn on your oven’s broiler to high and move one rack to the top of the oven – leave another in the middle in case things are browning too much. Once the broiler has heated up a bit (about 5 minutes), spread the vegetables out in a large, heavy, oven-safe pan, such as a cast iron skillet, enameled pan, sturdy sheet pan, or roasting pan. Place on the top rack for 7-10 minutes (checking occasionally to make sure they’re not burning) and stir to get them evenly roasted after another 5-7 minutes. Transfer the vegetables to a bowl and set aside (no need to cover, you don’t want them to steam more and they’ll be fine even if they’re not piping hot). Put a very small amount of oil in the pan (just enough to give a little bit of lubrication, not enough to form a layer) and add the chicken, shacking off as much marinade as you can. Broil for 5 minutes, flip, and repeat 3 more times. The last time you may find that the outside of the chicken is thoroughly cooked and doesn’t need more browning – this is when you move the whole pan down to the middle rack. When the chicken is done, pull the whole pan out and let the chicken rest uncovered while you cook the naan. Place the naan directly on the oven rack for 30 seconds per side just to warm it through and brown it very slightly. Once the naan is out of the oven, chop the chicken into bite-size pieces – I recommend holding the chicken with tongs and using a wooden cutting board, rather than plastic.
Assemble:
You don’t really need instructions for this, right? It’s up to you.


