To Build a Buddha
The phrase “thangka painting” is used often to describe Buddhist and traditional Tibetan art, but the word thangka is actually much broader, and used to encompass anything from a simple painting to a complex three-dimensional piece of art. Generally, it includes the original painted or embroidered picture, mounted on some textile, and framed with anything from leather corners to wooden and metal dowels at the top and bottom. Thangka paintings are always religious, although their subject matter and specific method of construction may vary.
The purpose of a thangka painting is to encourage contemplation; to aid in one’s meditative imaginings or to provide an object lesson for the viewer to reflect upon. A laborious effort, they were almost exclusively created through commission, usually by aristocrats but sometimes by monasteries or even with money pooled by laypeople to commemorate some event. What distinguishes thangkas from other art forms is their anonymity: very rarely do the artists sign their name on their work, instead choosing to focus on the subject matter and the story told within.
The most important distinguishing feature of a thangka painting is its method of construction: It follows a very strict set of rules that govern proportion, composition, color, and subject matter. Prevailing rules include emphasis on the number twelve, drawing from the twelve stages of the Buddha’s life and manifesting in the geometric proportions of the painting itself. This literal construction makes Buddhism a fundamental, tangible part of the image, and imbues the thangka work with heavy religious significance.
For my final project, I will document my own creation of a digital thangka painting of the Gautama Buddha, following the documented rules set out by the Drepung Gomang Monastic College and the book Principles of Tibetan Art, with coloring information from the Rubin Museum’s Gateway to Tibetan Art exhibition.
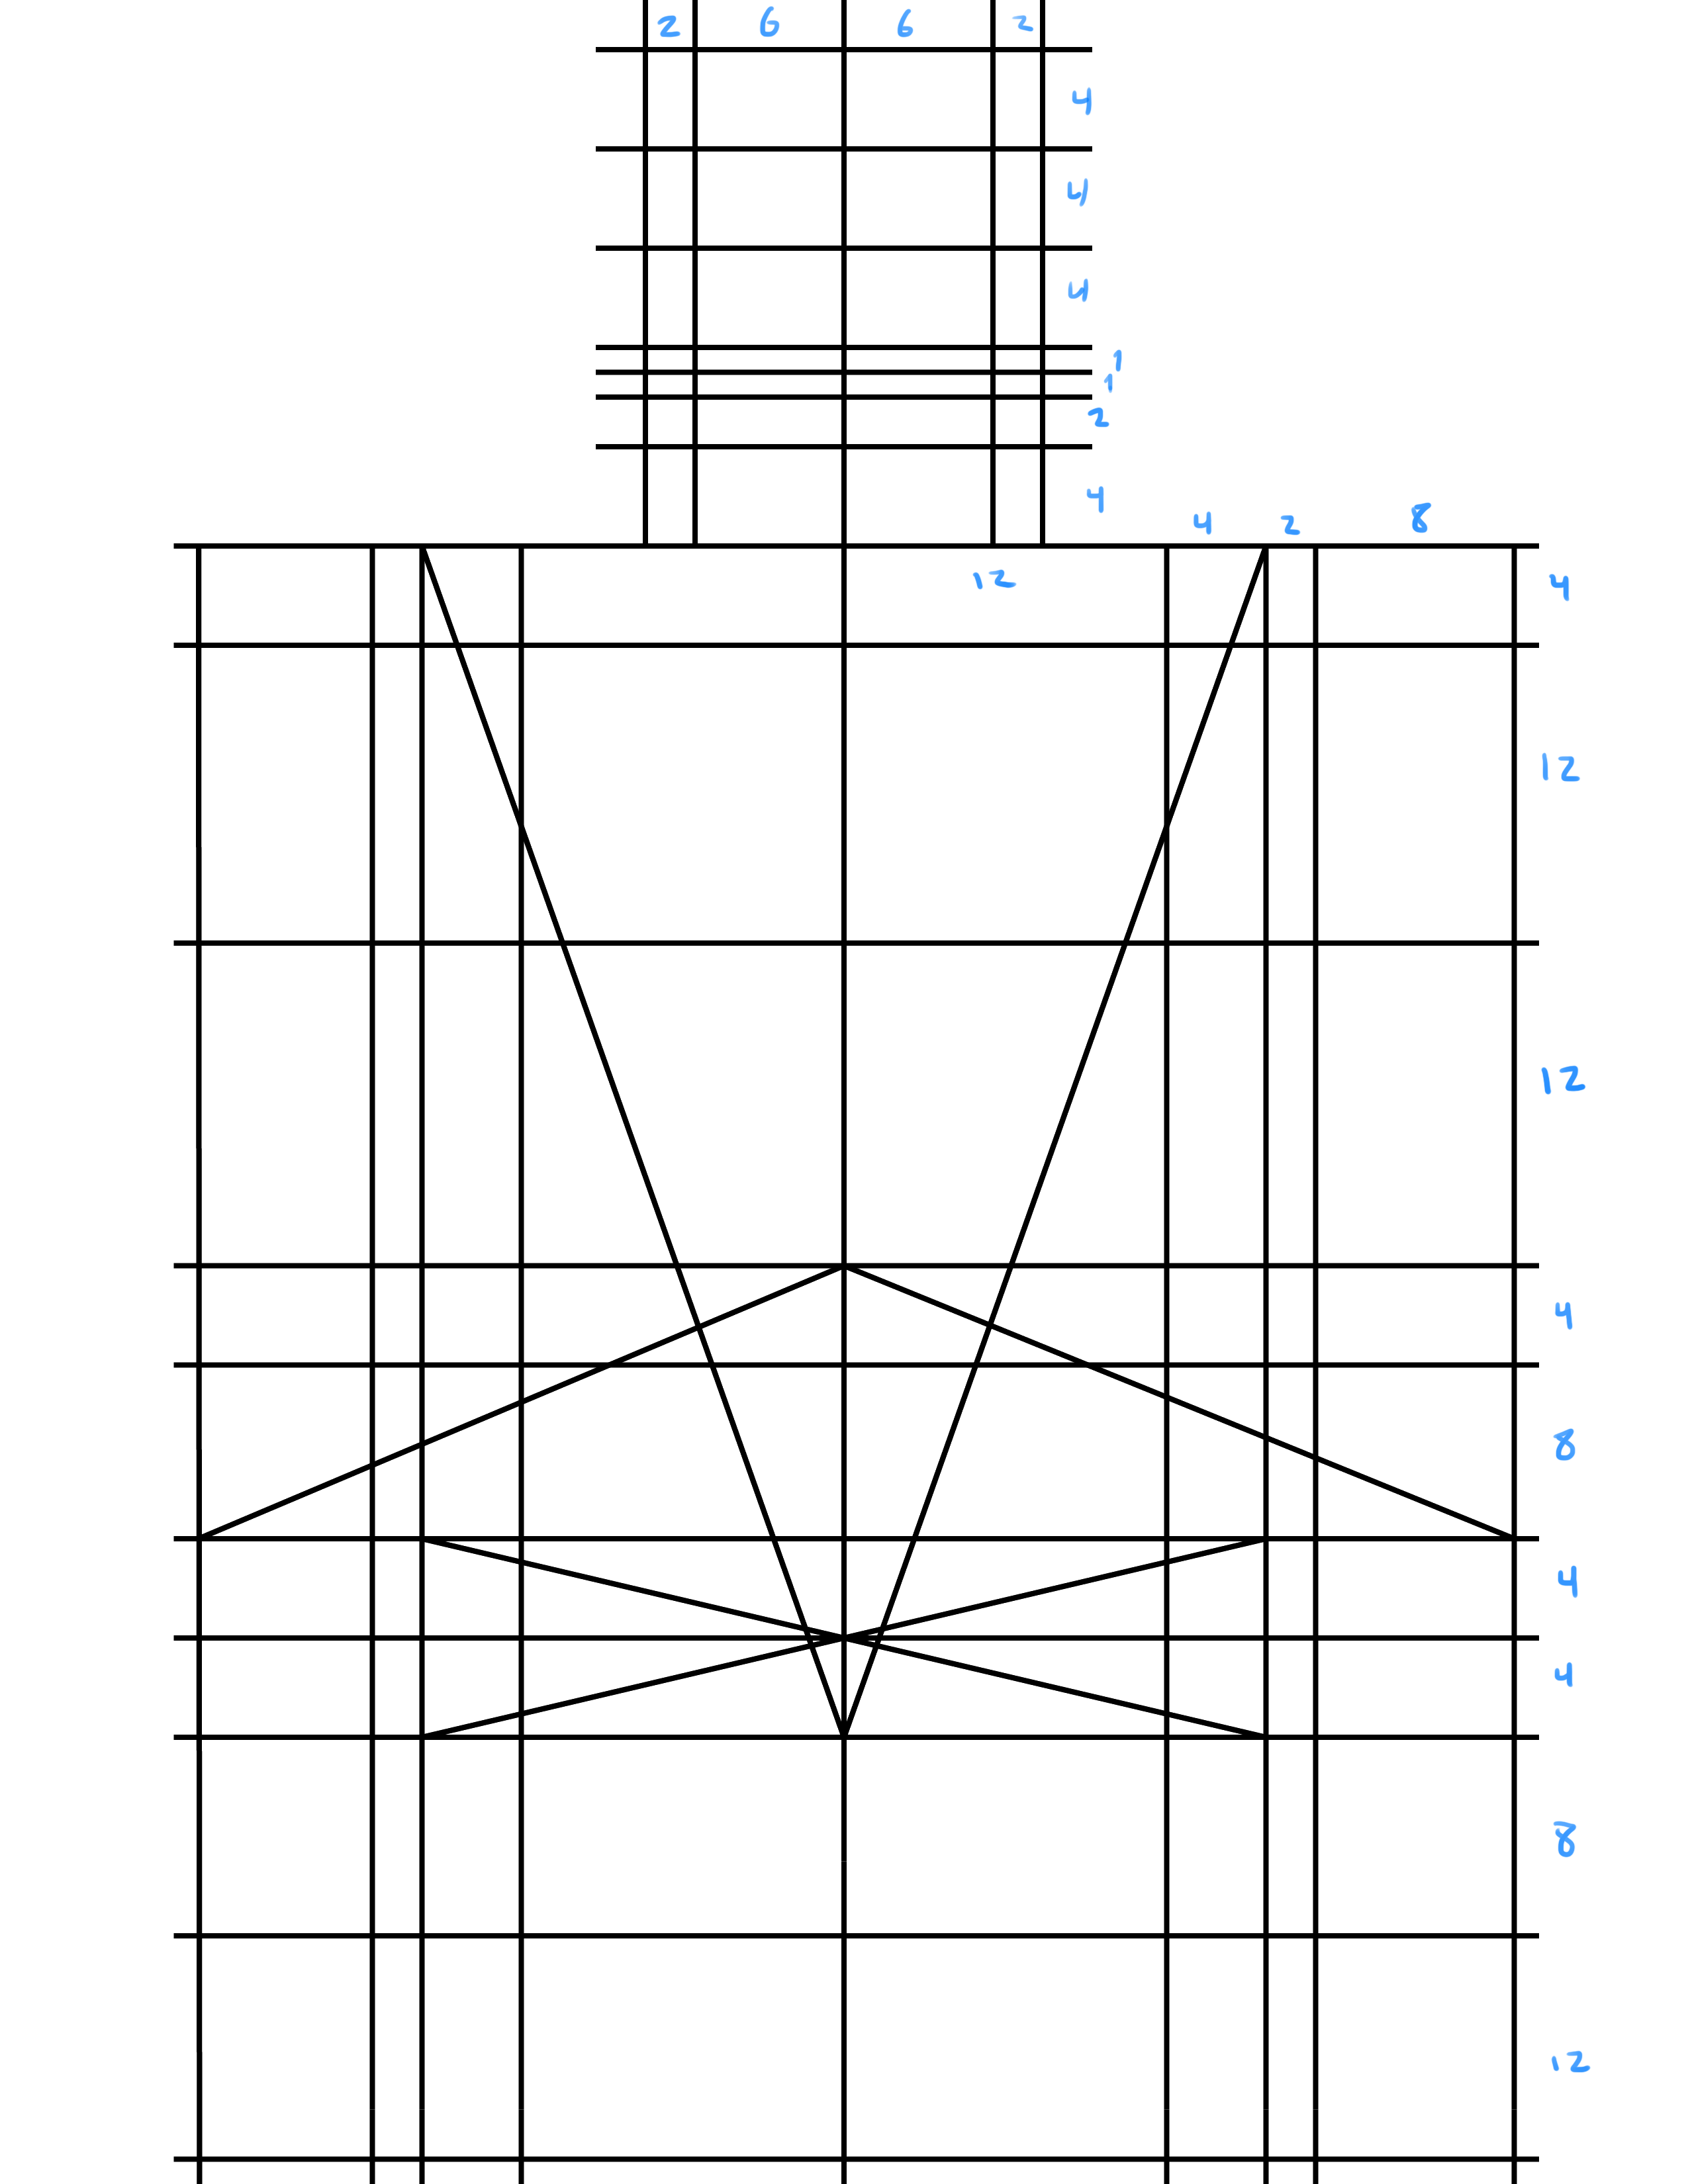
I took the proportions for the guidelines from the Drepung Gomang college and the Principles of Tibetan Art, which describes each ratio in painstaking detail. They didn’t include the facial guidelines, so I’m drawing those from Principles. Here, in this Rubin exhibition, the head of Saraswati, Goddess of Learning and the Arts, is displayed in such a fashion. In my piece, however, I’m keeping the head upright for the sake of symmetry.
On the next page is my constructed set of guidelines for the beginning of the painting, made geometrically perfect using vector graphics. I’ve marked the ratios where possible to illustrate the symmetry and the emphasis on the number twelve and its integer fractions. The straight vertical and horizontal lines will be the constraints for when I draw the rest of the body, but the diagonal lines will actually be traced by my digital brush to create the contours of the Buddha. The two v-shaped lines are drawn from the shoulders down to below the navel to create the contour of his chest and waist, and just below the center, the inverted v and x will become the outline of his crossed legs.
Now that we’ve established the guidelines for the Buddha painting, it’s time to move on to the next stage: pencil sketching. Since I’m working digitally, I can just use a normal brush and lower its opacity. The sketch was blue so I could differentiate it from the guidelines.
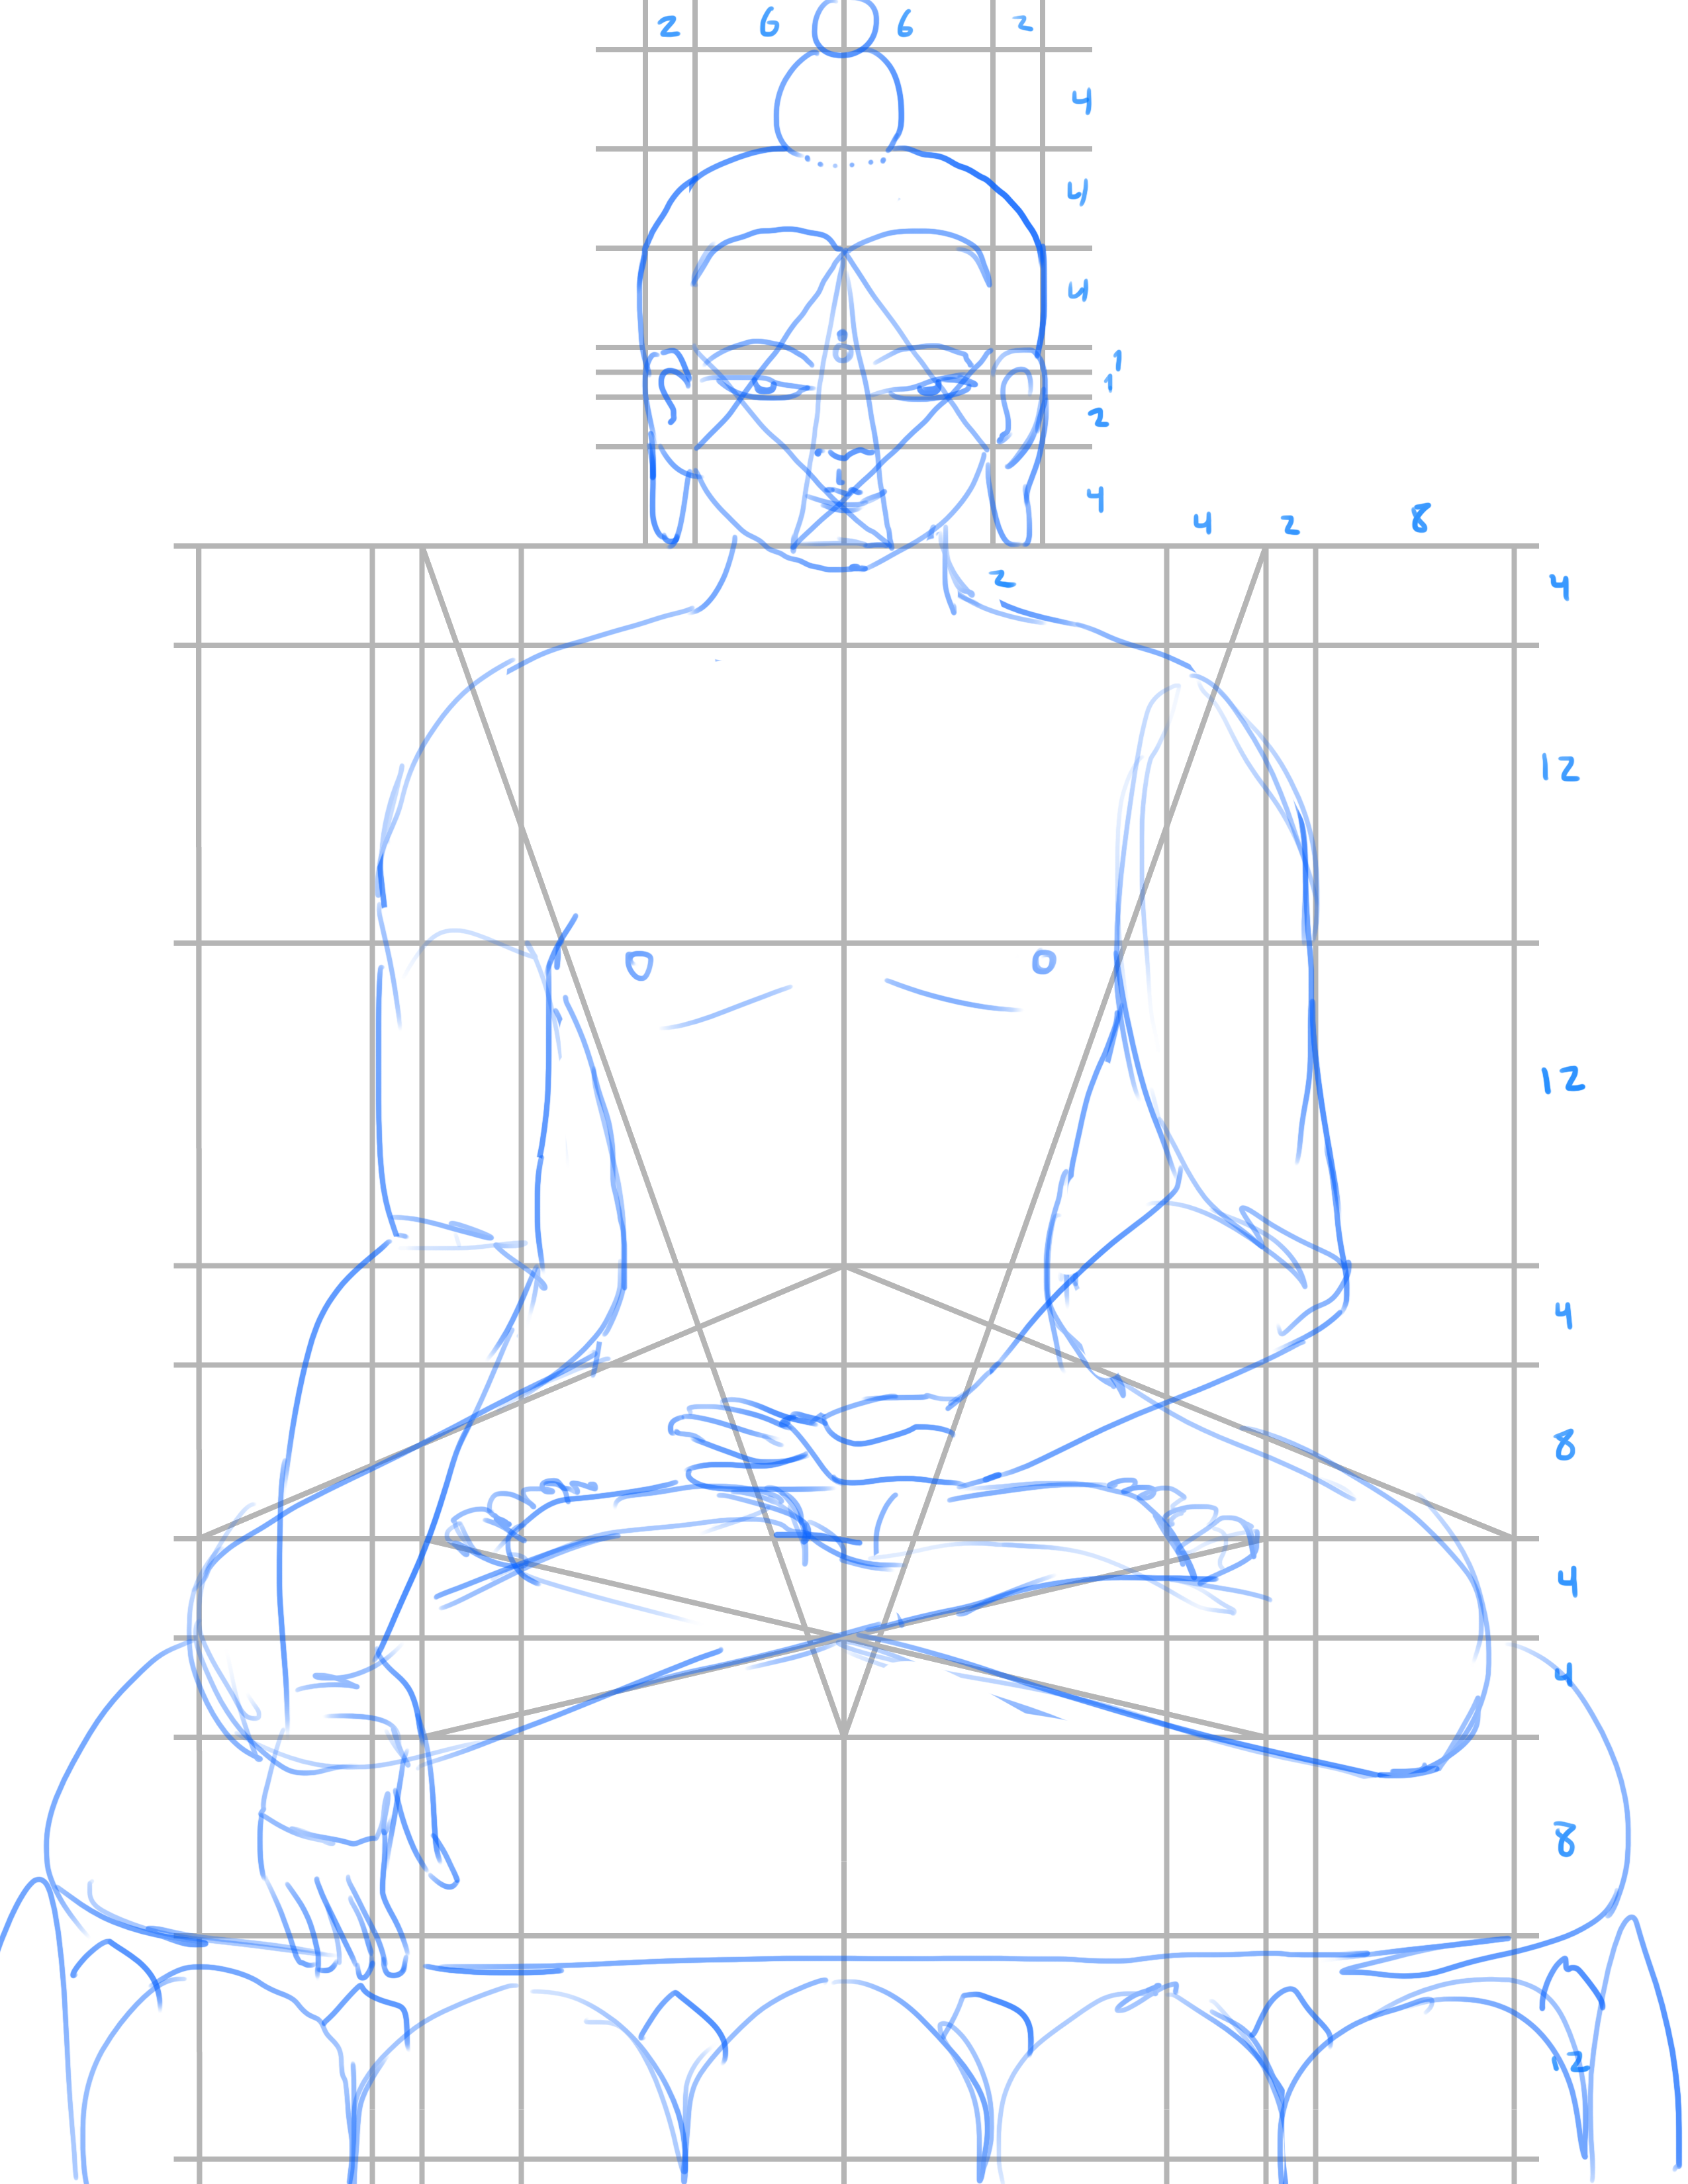
There are several artistic choices I’ve made here that go against some of the general rules for drawing the human figure. However, the sum of these deviations is to present a stylized view of a person, and it is this general style that is strictly ruled in the Principles of Tibetan Art. To name a few examples, no joint bones or veins can be visible, and the fingers must be slightly webbed and smoothly tapered. The shoulders should be rounded and the waist well-defined (53).
Beginning from the top, I included the sketched compass to pinpoint the corners of the eyes and to triangulate the mouth and nose, something that was absent in my reference material but extant in the artwork from the Rubin museum.
I was also originally going to give him collarbones and a small dip in his neck for the trachea, which are visible in most shirtless people, but then realized that the most common depiction of the Buddha includes neck folds instead. His waist is also more tapered than one would expect, but still in line with the style and a proportion that follows from the v-shaped lines drawn down the center of the piece.
I’ve still included some modern figure drawing practices just to make it easier on myself for him to seem three-dimensional. For example, I included pentagon shapes for the sketch of the hands, the forms of which aren’t dictated by the geometry and must be drawn freehand.
As for the rest of the imagery, the Buddha is depicted as seated on a lotus throne, and I included more natural motifs (like subtle plant textures in the background) when I started to color the piece.
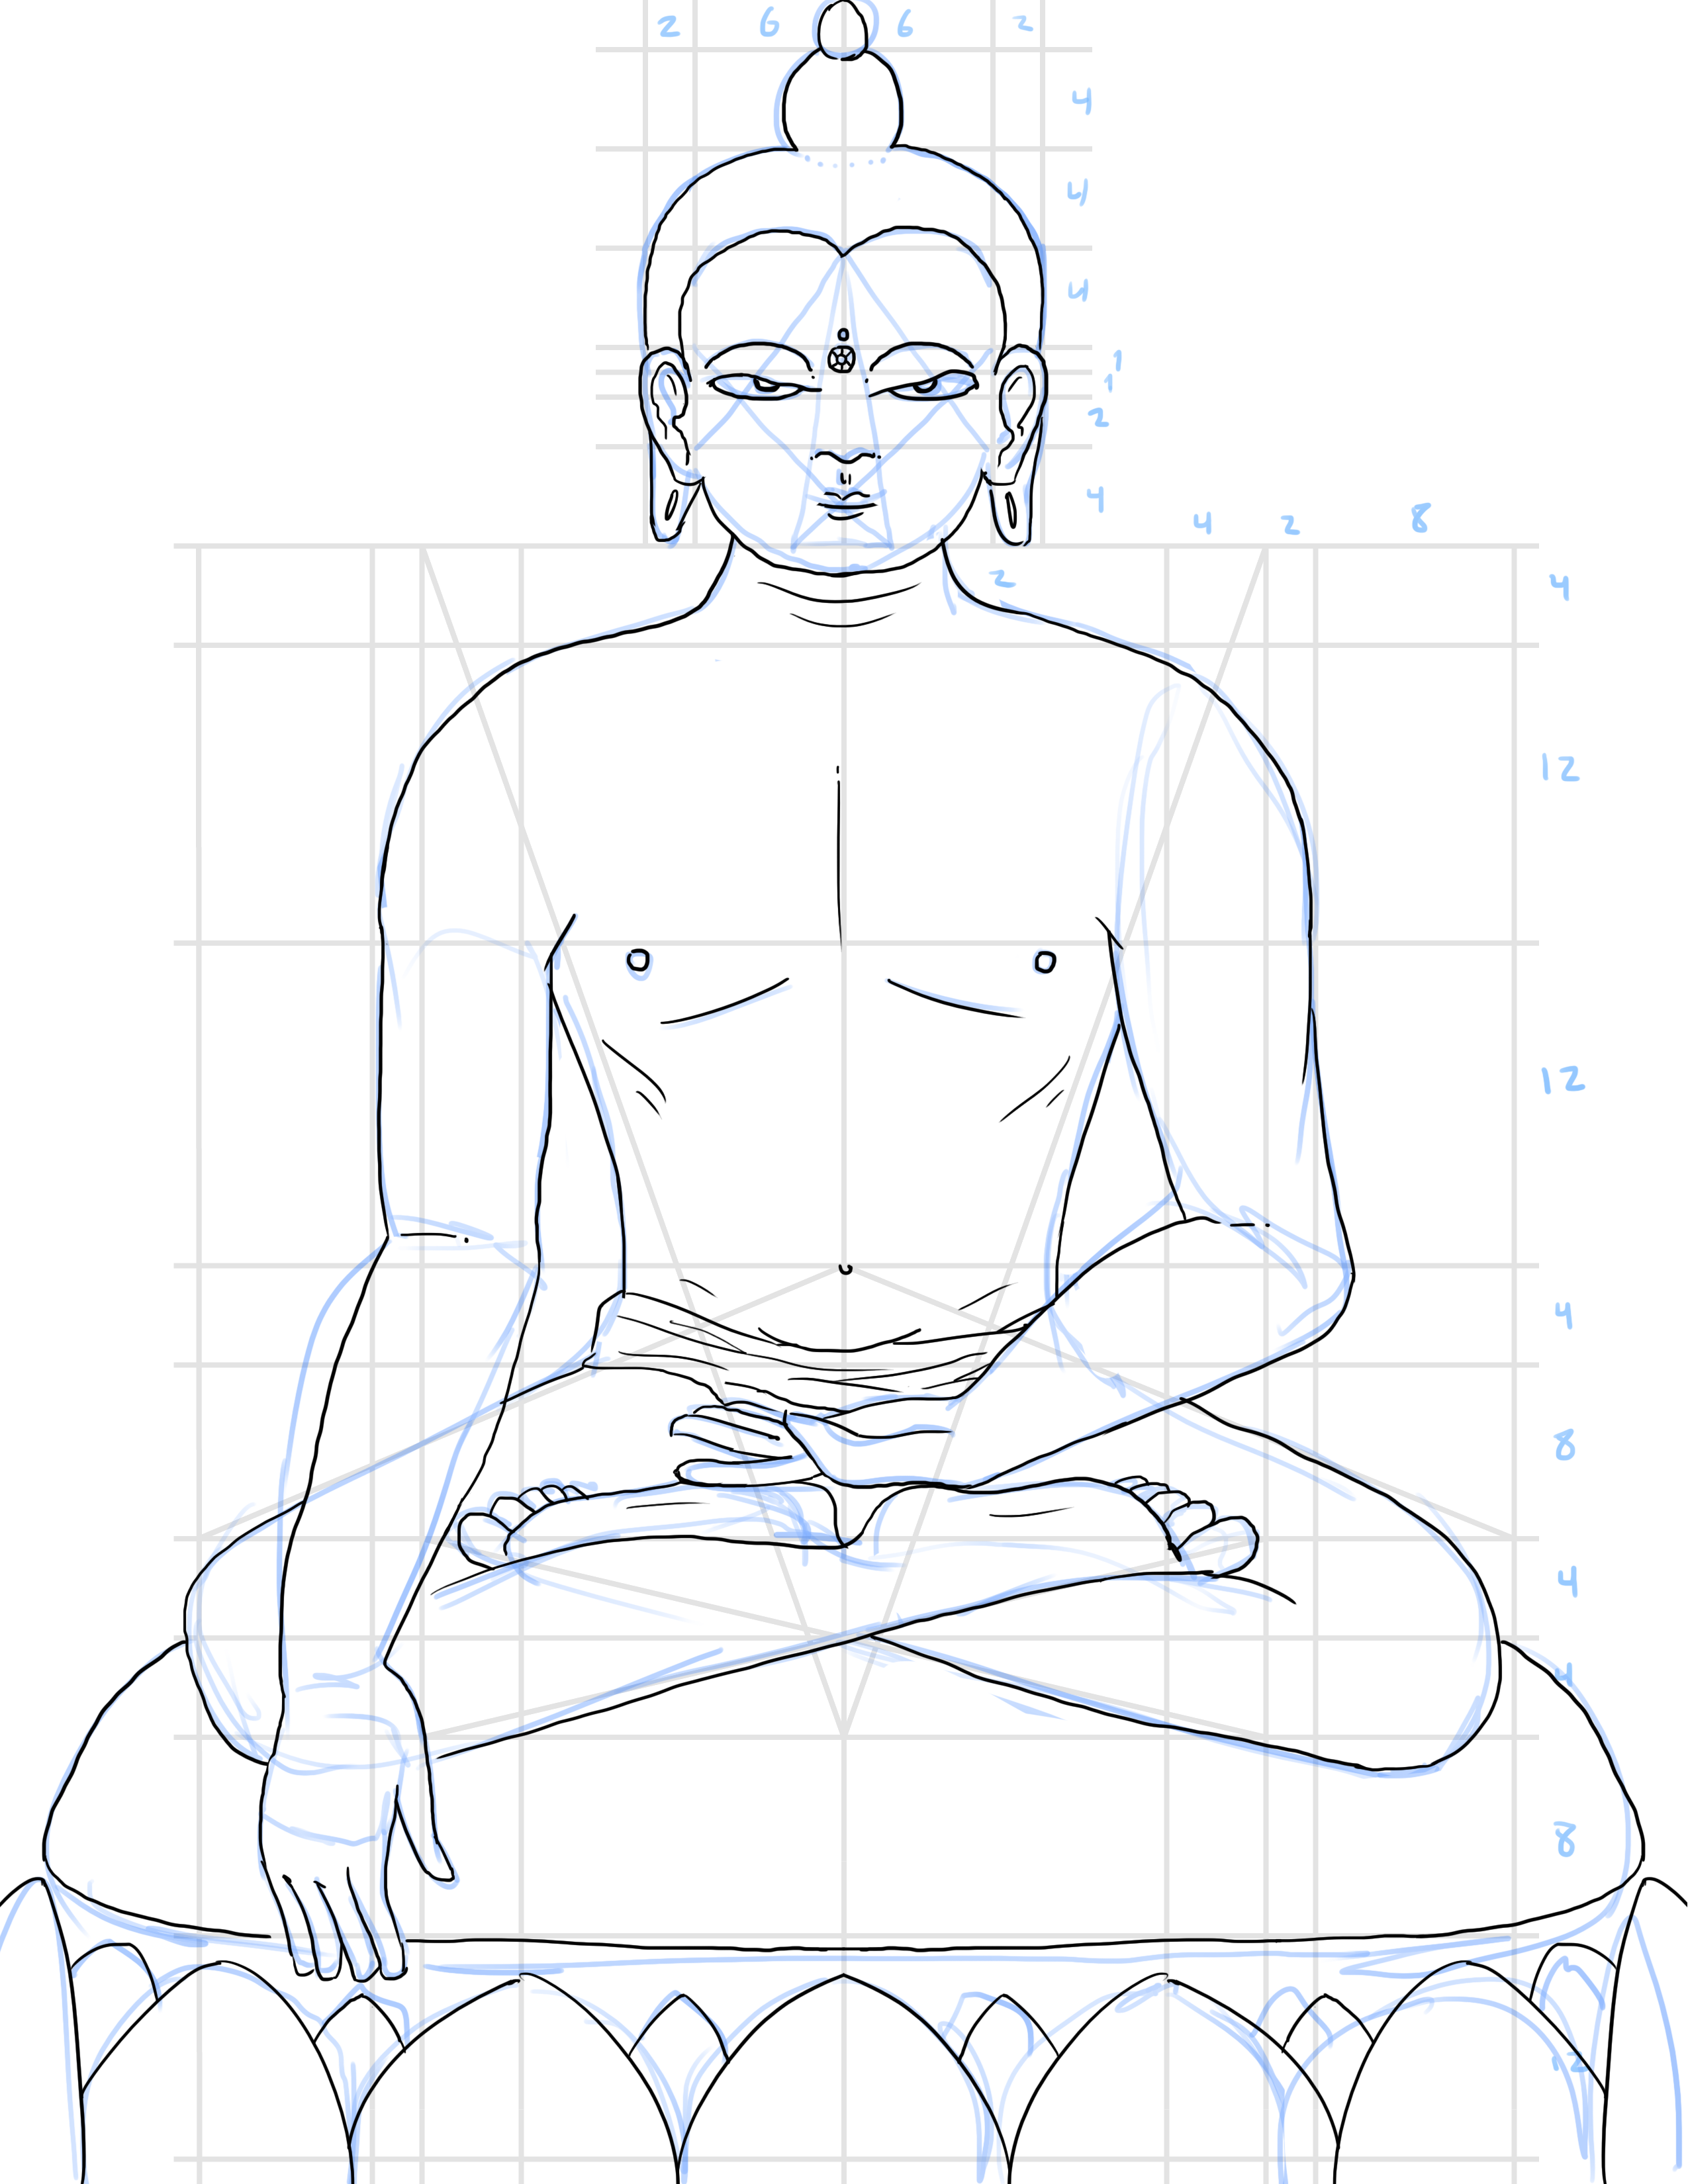
The inking process is shown on the next page, where I traced over the sketch with actual lines and refined a few of the details. I paid particular attention to my techniques and brush settings: I wanted the highly variable line weight, yet solid color that would come with an ink brush, so kept the opacity at full no matter how hard I pressed on my tablet. I also stayed away from the sketchy, chicken-scratch style in favor of the simple-line style, almost a prototype of the French ligne claire but without the cartoonish proportions and smooth brushstrokes. I was tempted to give the figure a heavier outline to stand out from the background, but I drew the Buddha to harmonize with his background, not clash with it.
According to the Rubin exhibition, after the initial charcoal sketch is completed, it is stretched and affixed to a larger, flat wooden frame. Then, a sealing agent such as a chalk, clay or a thin layer of glue is applied to the surface of the canvas to keep the paint from being absorbed. As it dries, the paint will also bond with the sealant to keep from losing its color or cracking.
Before any color is applied, however, the charcoal sketch is first completely traced over with ink. Only then does the artist begin with the most basic colors, starting with solid blocks and then refining them into gradients in the next step, which is on the following page.
The colors themselves are physically valuable, on some occasions made from crushed semi-precious stones like malachite, azurite, and cinnabar for green, blue and red, respectively. They are then mixed with another sealant, usually glue, and then brushed onto the canvas.
For the background, I chose a slightly textured gradient: fading dark green up the image until it reaches a muted turquoise. The green symbolizes balance, and the blue the notion of ascension. The gradient is their logical progression. I also included a halo, since Gautama Buddha is said to have been depicted with one and statues of him usually include a stone version. The brighter, more saturated orange both complements the turquoise at the top and symbolizes the teachings of the Buddha himself. In the sky, I also chose to include the stars to symbolize the heavens (another popular motif in thangka paintings) and in them, the Taurus constellation in the top right corner. Gautama Buddha’s birth was said to be under the Taurus sign (Grünwedel 130).
In terms of meta-technique, I also followed a few of the guidelines (the ones that I could, for example I couldn’t consecrate my digital bush) set out by the Principles of Tibetan Art: I made the entire thing in one pass, “without procrastination” (43) with only a break three hours in (out of six) to eat. I also took care to revise the previous inking of the eyes in the next version to make it clear that the Buddha wasn’t looking up. Such a mistake would result in myself, “the artist having to leave his locality” (52). And if I knowingly left mistakes in any other parts of the Buddha’s body, the same physical dysfunctions would happen to me in my next life.
On the next page is the version with the background completely colored in. As is traditional according to the Rubin, the artist must first complete the background, then the clothes, and then finally add color to the Buddha himself, finishing with the eyes.
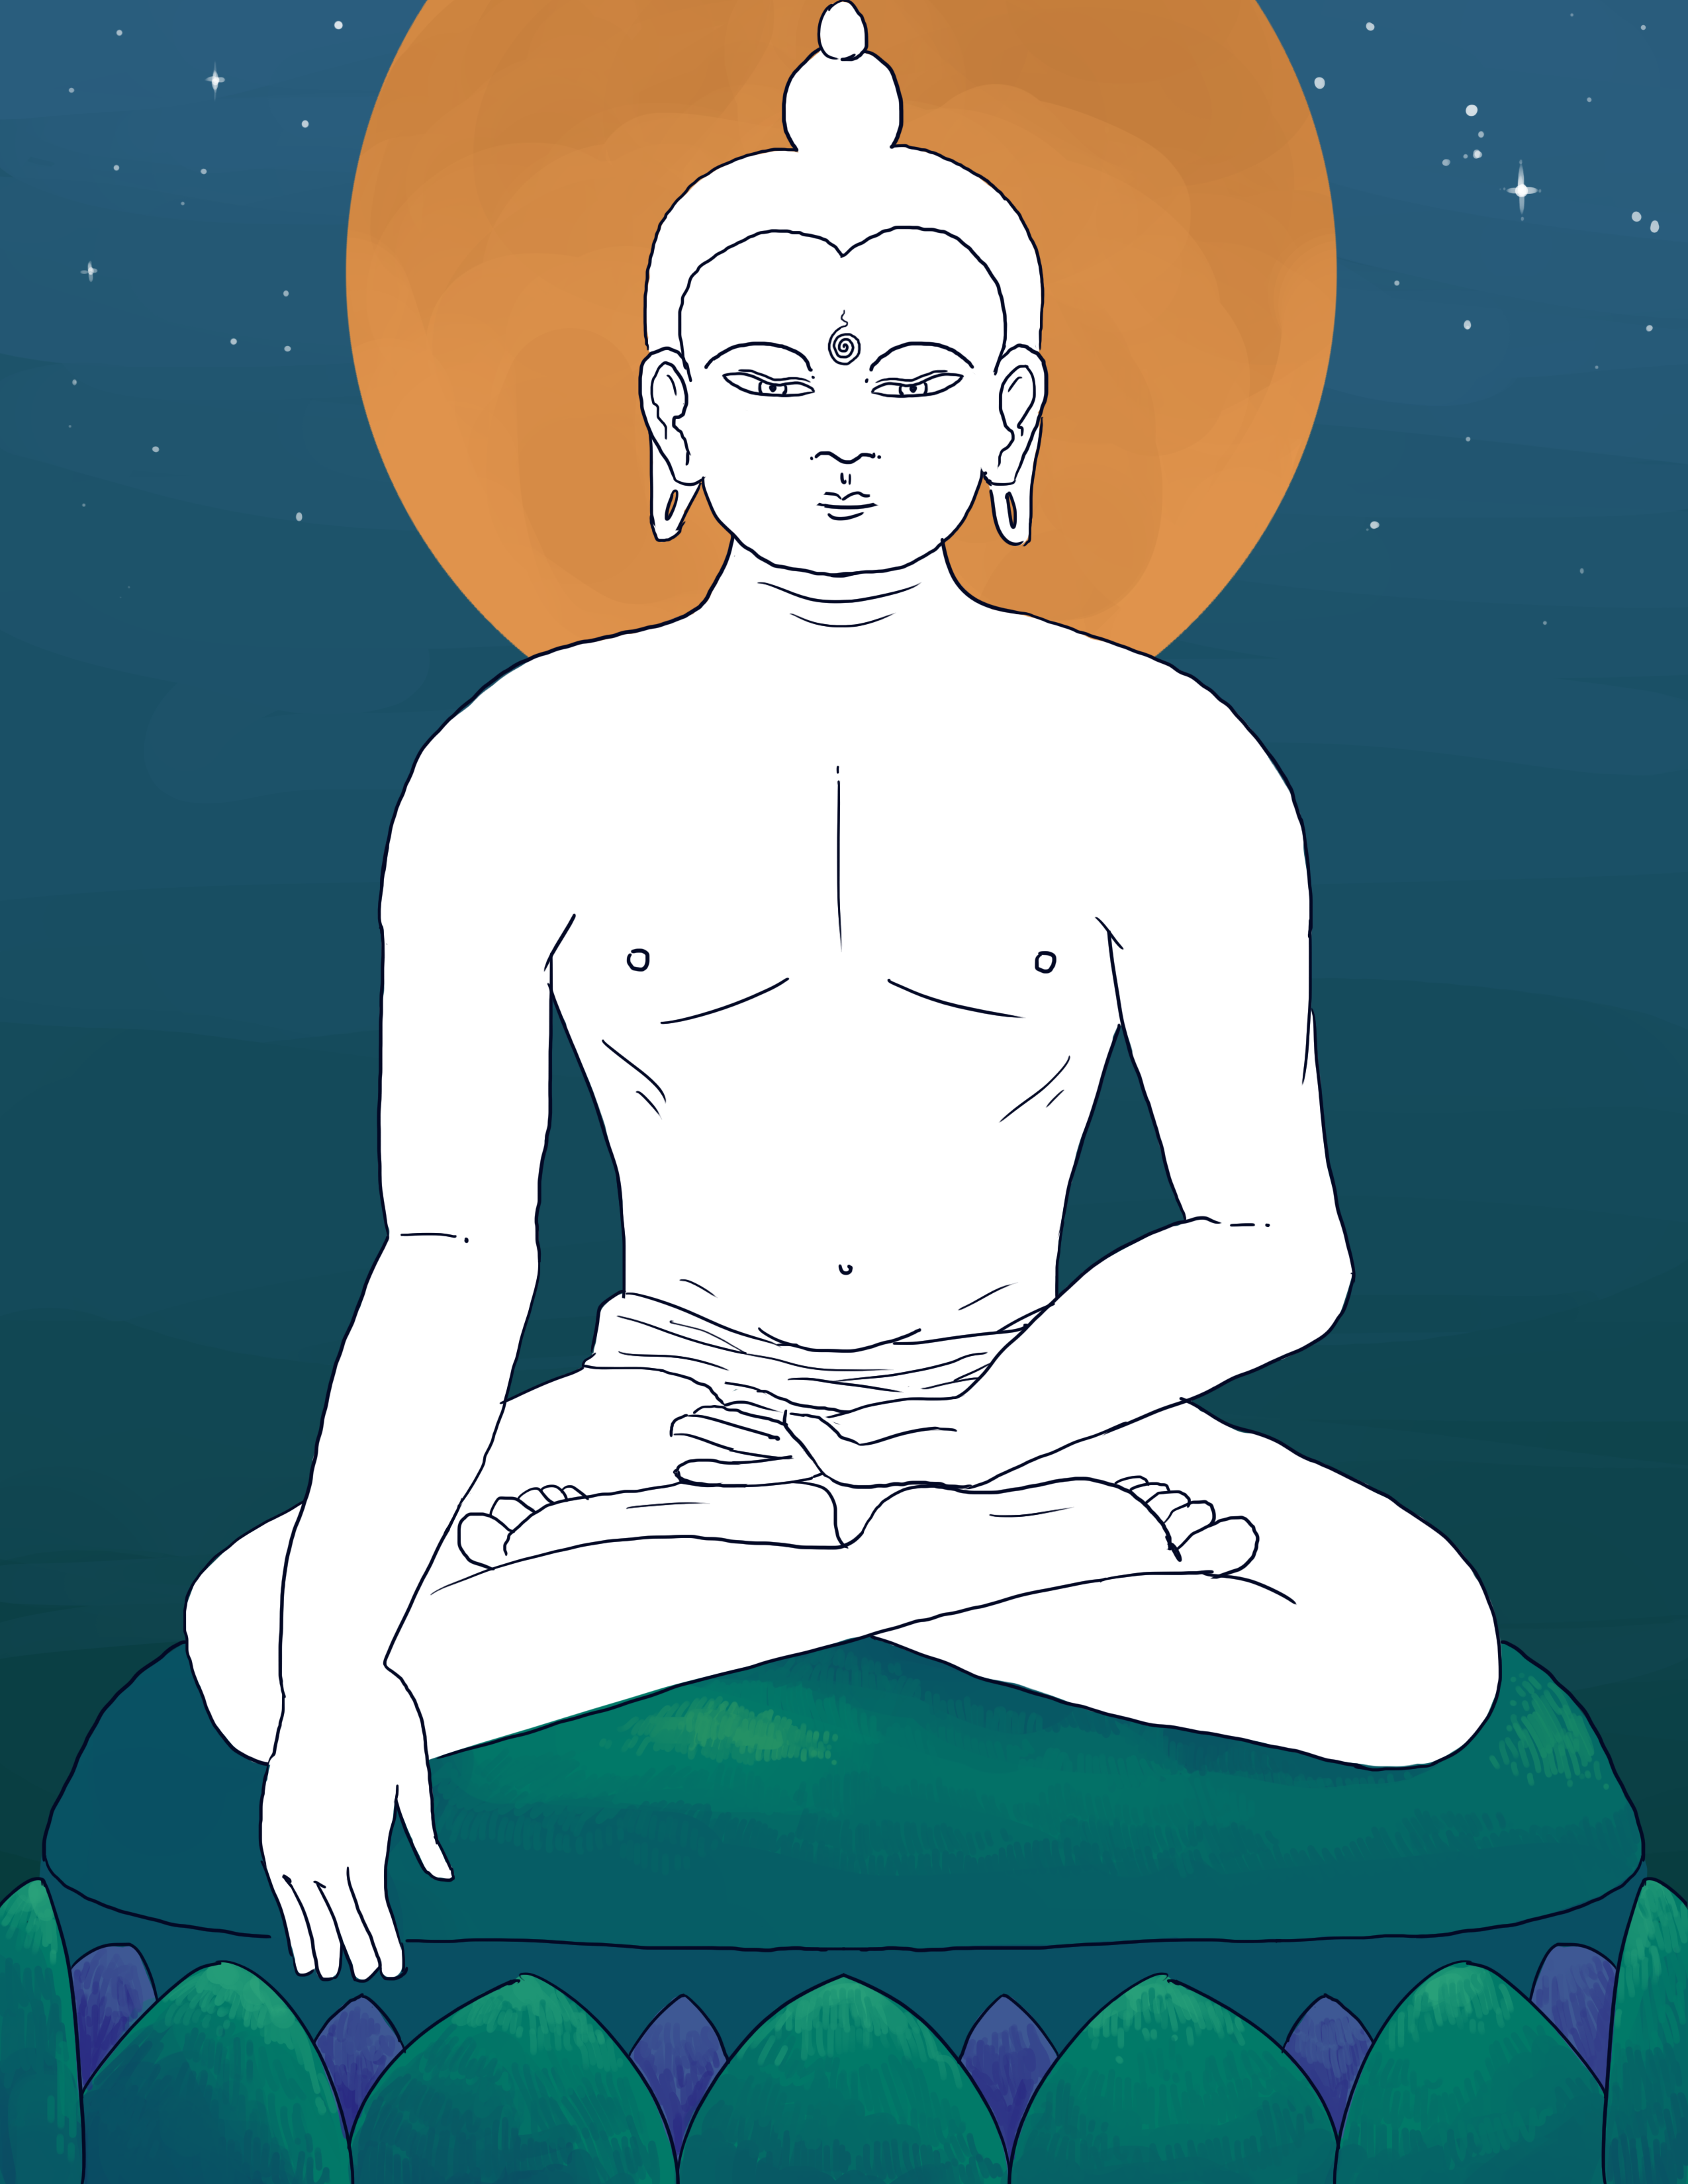
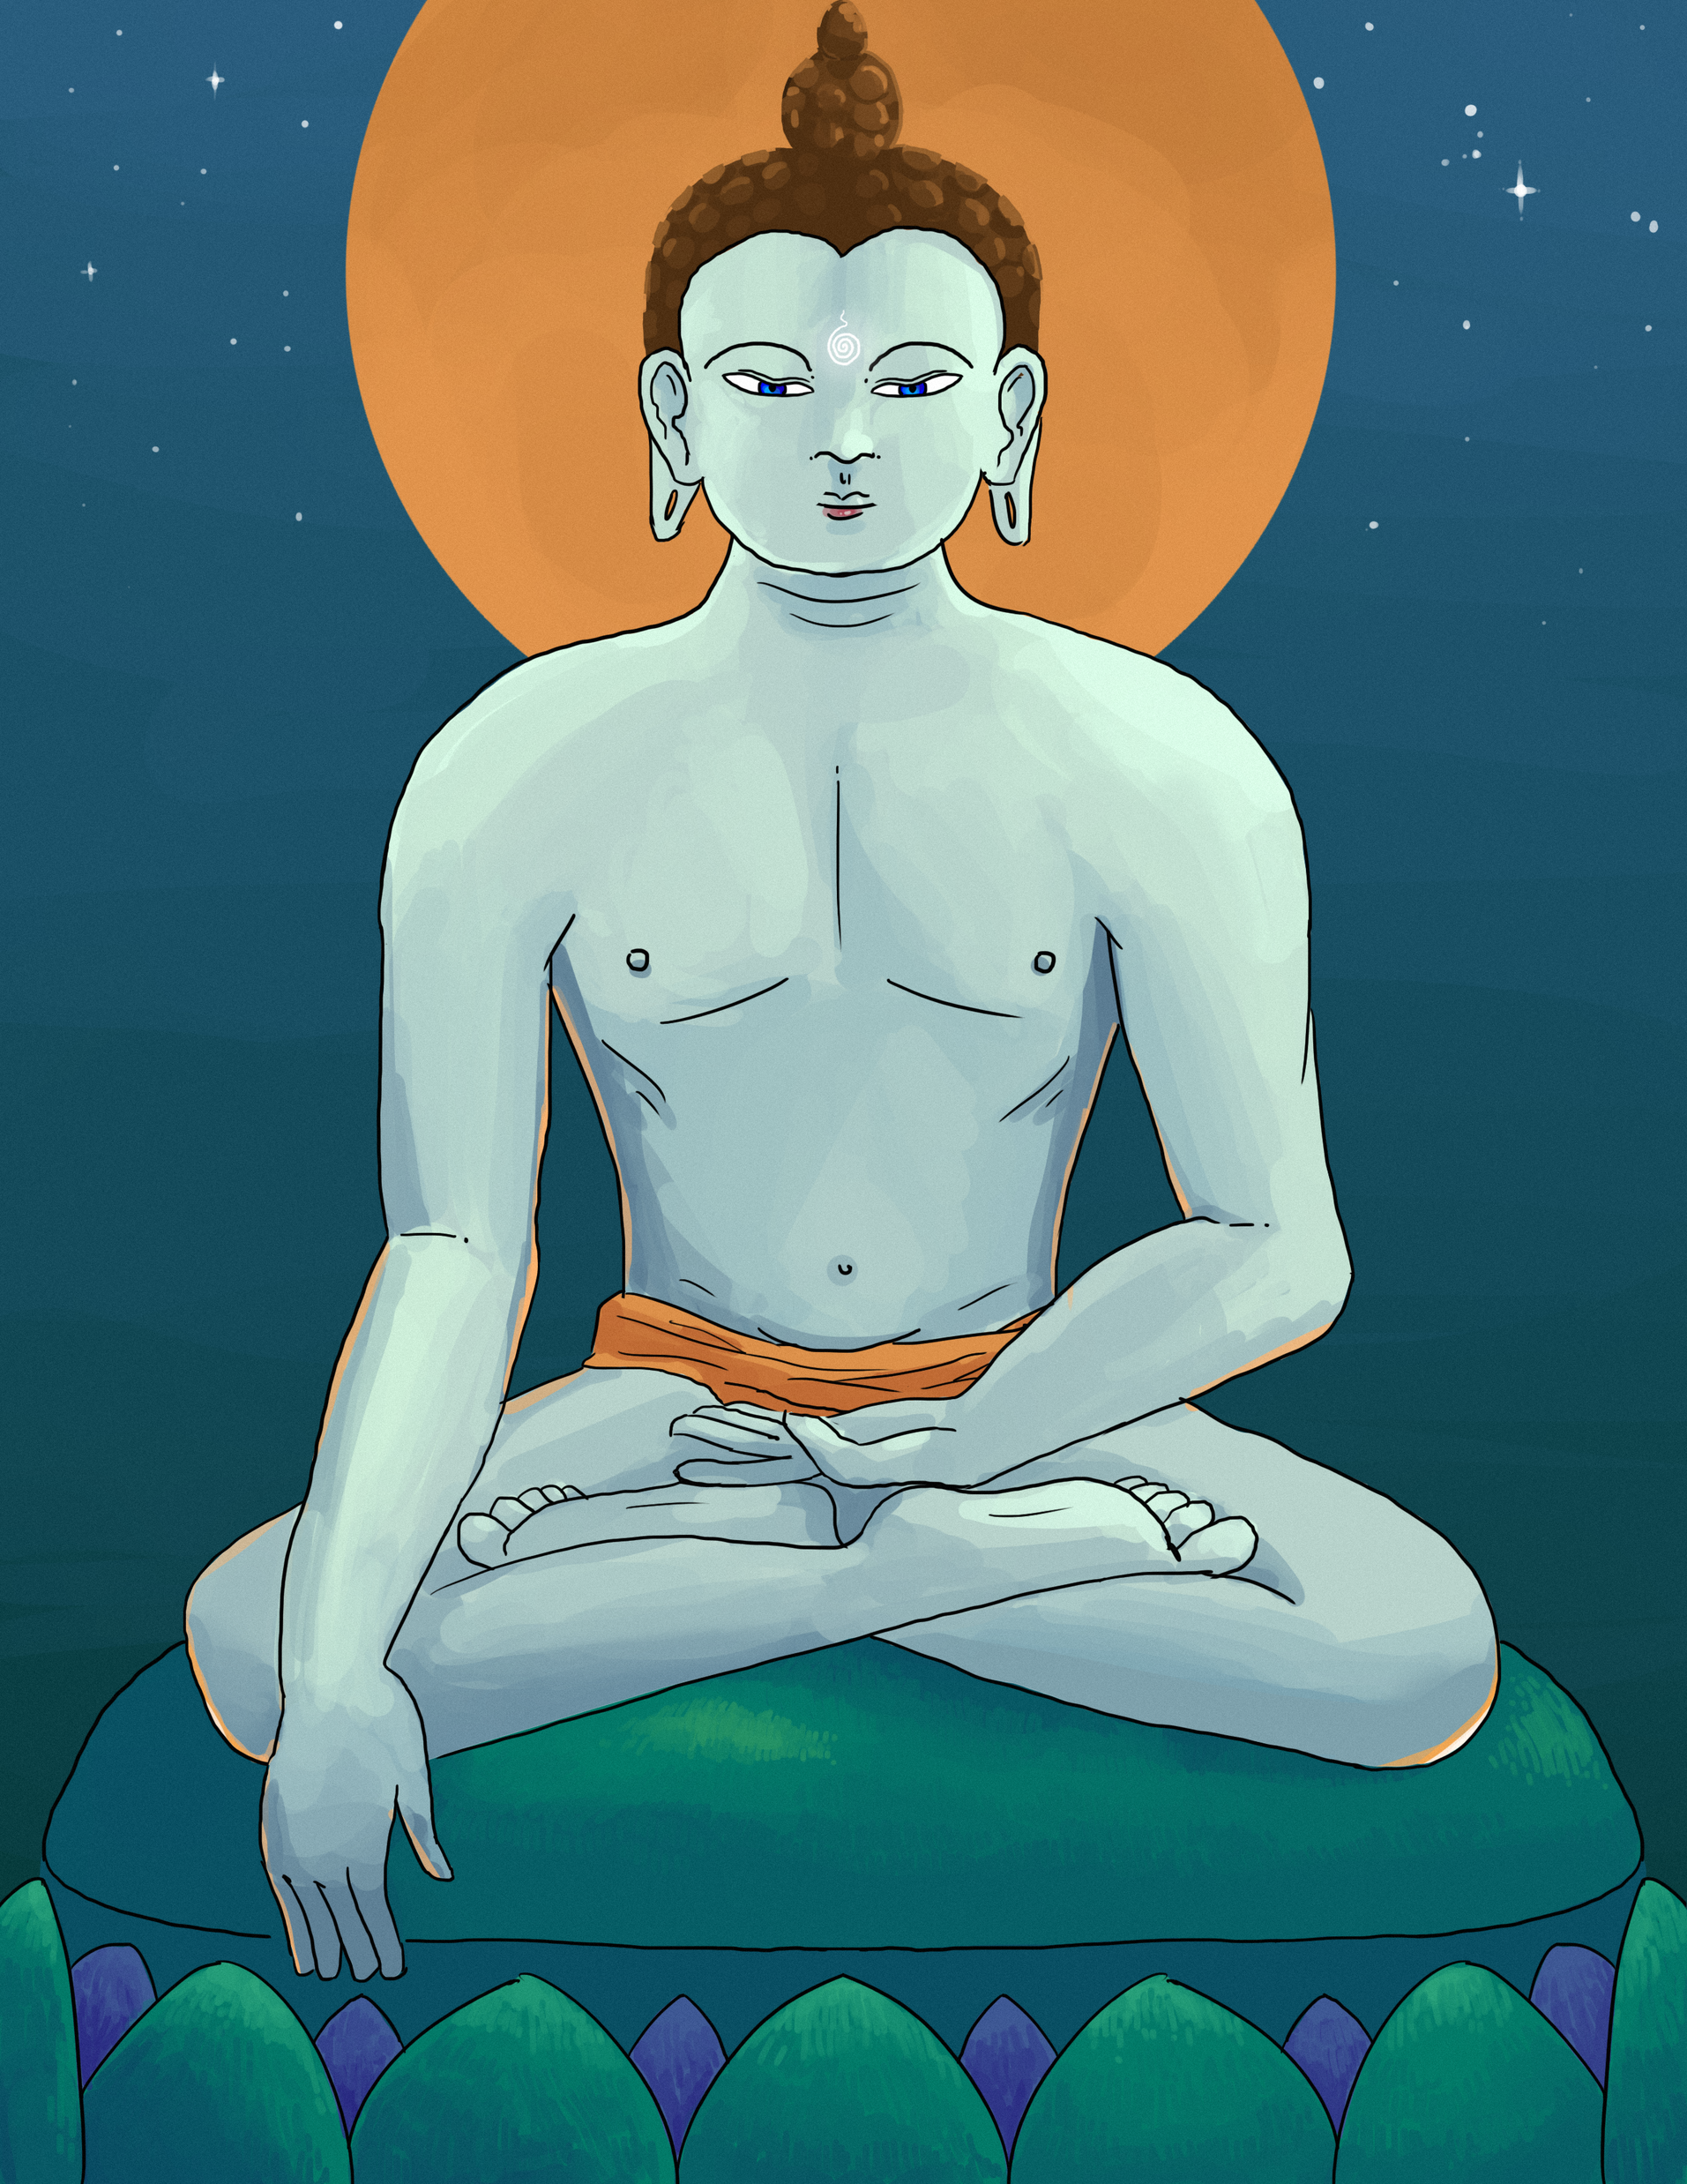
Above is the final version. I painted his eyes last, deep blue according to the 32 characteristics of the Buddha. But the eyes weren’t the only decisions I made while I was coloring. To begin with, I made his clothing (since that should be drawn before the skin is shaded) a slightly more yellow shade of orange than his halo, to evoke both his teaching and the saffron of monk robes. I also used a soft white radial gradient on his forehead to give his hair the traditional soft white glow. Finally, I used a slightly blue tint for his skin to both contrast the orange robes and to give the impression that the Buddha is illuminated by moonlight, another motif in thangka paintings.
In terms of rendering and shading techniques, there are also a few conscious techniques that I wanted to emphasize. In the background and on the lotus seat, I barely blended my brushstrokes, and even emphasized them in some places. This serves to both bring out the texture of the leaves and provide a contrast to the way I shaded the Buddha’s skin, which uses more similar hues and smoother gradients. According to another of the 32 characteristics of the Buddha, his skin is soft and smooth. I also gave him an orange backlight in the lower sections of the image. In addition to providing contrast with the darker parts of his body, it also combines with his orange loincloth to provide vertical symmetry with the larger orange halo at the top of the image. The last pass I made in Photoshop was to add subtle noise to the background, giving the digital equivalent of the texture of a painter’s canvas. Finally, I left out my signature to preserve the anonymity of the piece.
As I finished this painting, I realized I had learned a lot more than I was expecting. Ultimately, though, the process was an extremely rewarding one, as I was able to venture into unfamiliar artistic territory, armed only with my research, and come out of it with a substantial piece of art, a sense of accomplishment and vague serenity, and a good deal of knowledge about traditional Tibetan art.
Works Cited
“A Brief History and Description of Thangkas.” Drepung Gomang Monastic College. Web. 15 Dec 2016.
Grünwedel, Albert. Buddhist Art in India. London: Bernard Quaritch. 1901. Print.
Lama, Gega. Principles of Tibetan Art. Amsterdam: Karma Gadri. 2011. Print.
Rath, Eric. “Draw a Buddha.” Mayul School Project. 16 Nov. 2012. Web. 15 Dec 2016.
Shaftel, Ann, M.A. “Buddhist Art: Tibetan Thangka Paintings.” Buddhist Art: Tibetan Thangka Paintings. N.p., 2012. Web. 15 Dec. 2016.